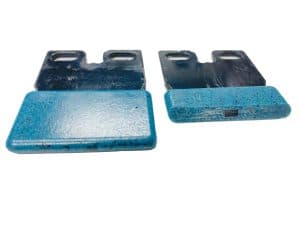
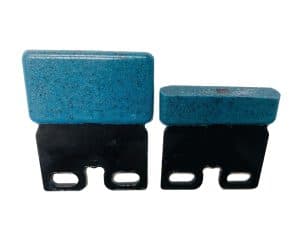
A: It is important to know what condition your concrete is in before starting.
- How old is the concrete?
- Has it been polished before?
- On a scale from one to six, what condition is your concrete?
- 1 – Pitted
- 2 – Rough (Grind Tool – Blue)
- 3 –Semi-smooth (Grind Tool -Blue)
- 4- Smooth with matte finish (Hone Tool -Green)
- 5 – Smooth with some reflection (Polish Tool – Natural)
- 6 – Smooth with reflection (+1 Shine Tool – Red)
- It is recommended that 6 passes are done with each tool in the system: Grind, Hone and Polish.
- Add in the +1 Shine (Red) Tool if you want to elevate the gloss level beyond industry standards:
- Starting with the Grind (Blue) Tool used to remove light coatings and preps floor with an open finish
- Hone (Green) Tool used to set concrete to a honed finish, ready for polish
- Polish (Natural) Tool closes concrete and brings out a clean satin/polished finish
- +1 Shine (Red) Tool used to enhance and maintain your polished floors to an unmatched gloss level using only your standard floor machine
Not sure where to start? Contact a Diamond Devil® specialist today.
A: The Diamond Devil®; Concrete Restoration and Polishing tools are not assigned a specific grit level,
as they are formulated with a proprietary diamond abrasive blend that is unique to our system.
A: The life expectancy of each tool will vary depending on the condition of the concrete.
Contact one of our Diamond Devil®; Specialists to get a square footage estimate.
A: No. the colorant in the blades will not transfer into the floor.
If you are seeing color in the slurry, that is indicative of selecting the wrong tool for the profile of the
surface. You may want to drop back to the next lowest polishing step before continuing.
If you have questions, please contact one of our Diamond Devil® Specialists for assistance.
A: For outstanding results use our natural color Polish tool. If you are looking for an unmatched reflective
shine, we suggest using our red-colored Shine Tool. Watch this video for more info.
A: When using the maintenance tool, check wear weekly.
Check for the black wear indicator coming through on the Blade as shown in examples below:


A: Auto Scrubbers will require the same size Diamond Devil®; Tool as the pad driver size recommended for the machine.
For Standard Single Disc or low-speed electric floor machines, Diamond Devil®; tools can be sized up one size from the recommended pad driver size and ordered with a 1 1/2” riser to accommodate edging.
A: Yes. Typically, low-speed electric floor machines use counter-clockwise (CCW) brushes/tools. However there are few types of single disc floor machines that are clockwise (CW), so it is suggested to confirm the rotation of the machine before mounting tool.
When determining direction, do so from the operator’s viewpoint and not from under the machine. (Click here for rotational instruction video).
For dual headed auto scrubbers, typically the one side spins counter-clockwise (CCW), and the other side spins clockwise (CW) Click here for rotational instructions video.
- NOTE: Tools are rotation sensitive, and it is imperative that the tools are mounted correctly to avoid possible tool or floor machine damage.
A: Diamond Devil®; Tools are available in sizes 12″ through 20″ block diameters and fit most standard floor machines.
Restoration and Polishing System.
- How old is the concrete?
- Has it been polished before?
- On a scale from one to six, what condition is your concrete?
- 1 – Pitted
- 2 – Rough (Grind Tool – Blue)
- 3 –Semi-smooth (Grind Tool -Blue)
- 4- Smooth with matte finish (Hone Tool -Green)
- 5 – Smooth with some reflection (Polish Tool – Natural)
- 6 – Smooth with reflection (+1 Shine Tool – Red)
* It is recommended that 6 passes are done with each tool in the system: Grind, Hone, and Polish.
Add in the +1 Shine Tool if you want to elevate the gloss level beyond industry standards:
- Starting with the Grind (Blue) Tool used to remove light coatings and preps floor with an open finish
- Hone (Green) Tool used to set concrete to a honed finish, ready for polish
- Polish (Natural) Tool closes concrete and brings out a clean satin/polished finish
- +1 Shine (Red) Tool used to enhance and maintain your polished floors to an unmatched gloss level using only your stand floor machine.
Note:
The Diamond Devil®; Polishing system is not recommended for use on decorative, stained, or brushed concrete. Polishing tools should be used only on indoor troweled concrete.
Before starting any polishing project, we strongly suggest working with one of our Diamond Devil®; specialists. Contact a specialist today
A: The Diamond Devil®; Concrete Restoration and Polishing System uses a progression of tools Grind, Hone and Polish that takes concrete floors to an even satin/polished finish. The optional +1 Shine Tool takes the finish a step beyond, to an unmatched superior image gloss and clarity.
Note: All Diamond Devil Tools are used on a standard floor machine or auto-scrubbers
A: The time required to restore and polish concrete floors varies depending upon the condition of the concrete floor, along with the square footage. The Diamond Devil®; Concrete Restoration and Polishing System is 3 steps -vs- the typical 6-step polishing processing. Less steps, less time on the floor saves time and money. Before starting any polishing project, we strongly suggest working with one our Diamond Devil®; specialists. Contact a specialist today
A: It is important to know what condition your concrete is in before starting.
- How old is the concrete?
- Has it been polished before?
- On a scale from one to six, what condition is your concrete?
- 1 – Pitted
- 2 – Rough (Grind Tool – Blue)
- 3 –Semi-smooth (Grind Tool -Blue)
- 4- Smooth with matte finish (Hone Tool -Green)
- 5 – Smooth with some reflection (Polish Tool – Natural)
- 6 – Smooth with reflection (+1 Shine Tool – Red)
- It is recommended that 6 passes are done with each tool in the system: Grind, Hone and Polish.
- Add in the +1 Shine Tool if you want to elevate the gloss level beyond industry standards:
- Starting with the Grind (Blue) Tool used to remove light coatings and preps floor with an open finish
- Hone (Green) Tool used to set concrete to a honed finish, ready for polish
- Polish (Natural) Tool closes concrete and brings out a clean satin/polished finish
- +1 Shine (Red) Tool used to enhance and maintain your polished floors to an unmatched gloss level using only your stand floor machine